RA8P1 Titan Board WDT Usage Instructions
English | Chinese
Instructions
Watchdog devices can ensure that our code is in our expectations, can effectively prevent our program because of some other uncontrollable factors caused exceptions; This routine mainly describes how to use the window WDT device on the Titan Board;
Hardware Description
None
FSP Configuration Instructions
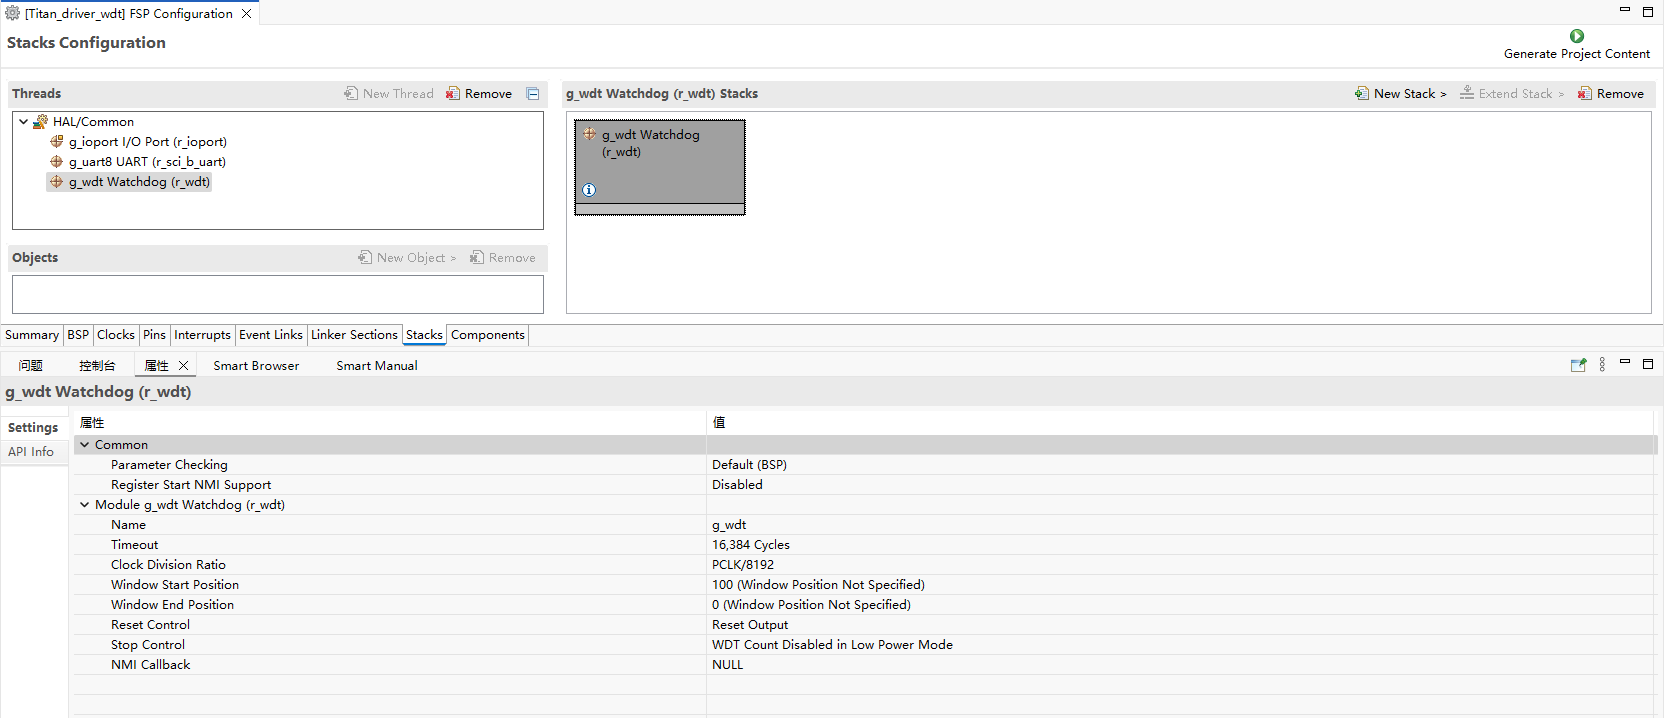
Open the FSP tool and create a new stack, selecting r_wdt.
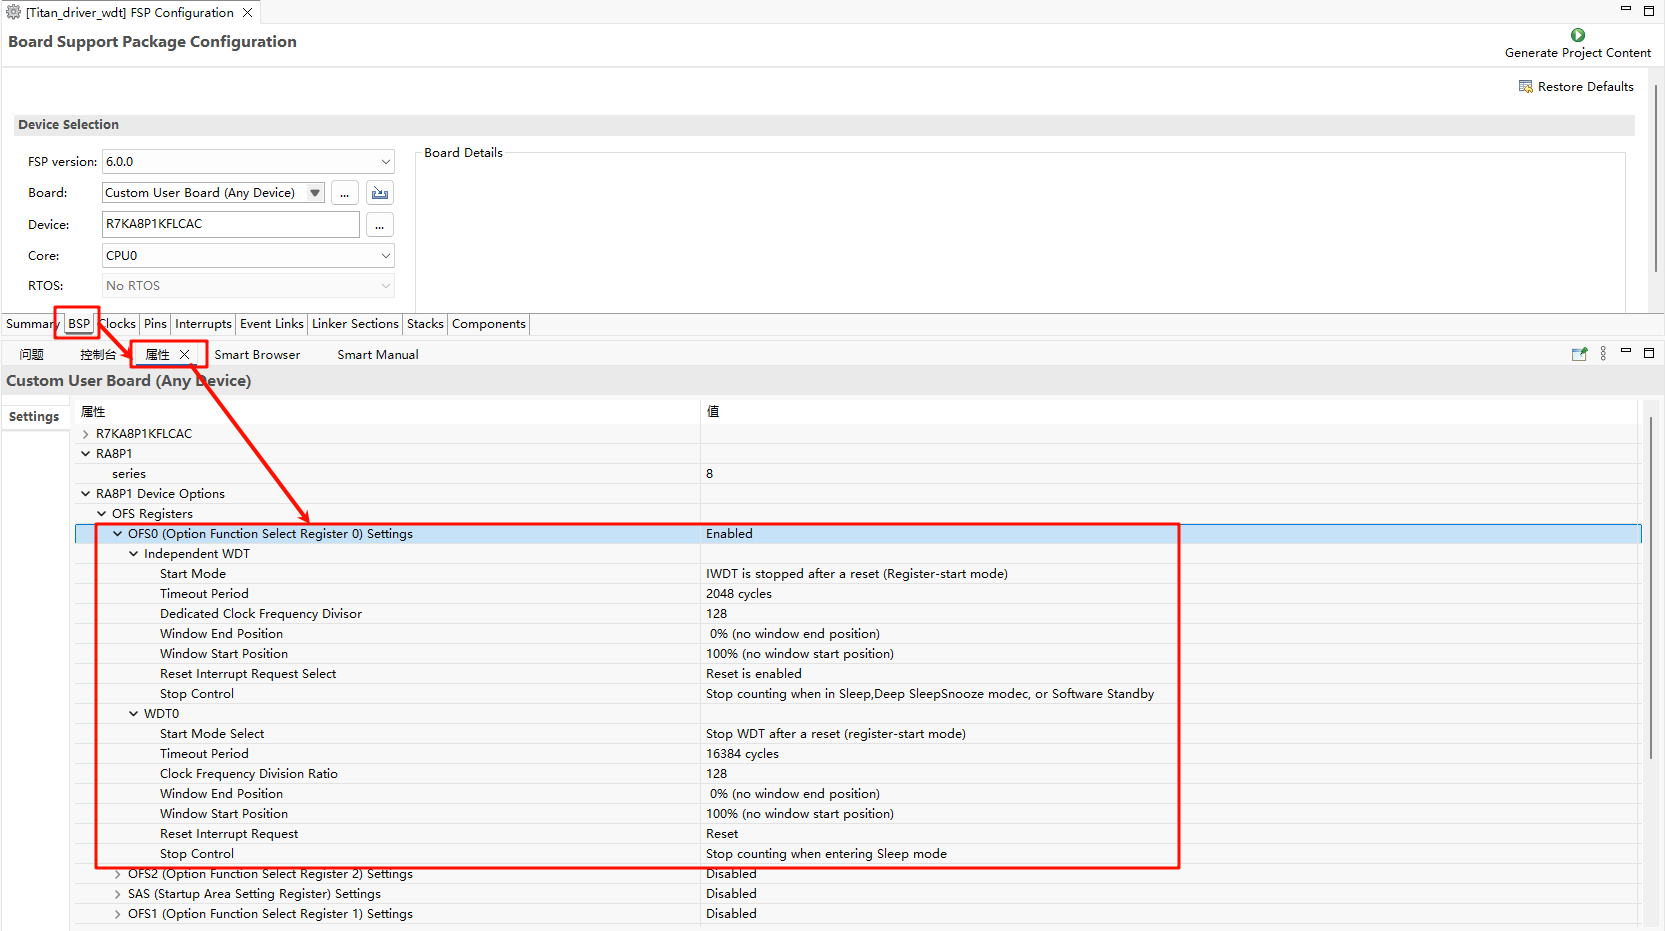
Note: Using WDT requires the OFS0 register configuration to be enabled.
RT-Thread Settings Configuration

Example project description
The sample program is located at projects/Titan_driver_wdt/src/hal_entry.c.
/*
 * Copyright (c) 2006-2024, RT-Thread Development Team
 *
 * SPDX-License-Identifier: Apache-2.0
 *
 * Change Logs:
 * Date           Author        Notes
 * 2024-03-11     Wangyuqiang   first version
 */

#include <rtthread.h>
#include "hal_data.h"
#include <rtdevice.h>
#include <board.h>

#define DBG_TAG "wdt"
#define DBG_LVL DBG_LOG
#include <rtdbg.h>

#define WDT_DEVICE_NAME "wdt"    // Default watchdog device name, depending on the BSP
#define WDT_FEED_INTERVAL 1000   // Feeding interval (unit: ms)
#define WDT_TIMEOUT 3            // Watchdog timeout period (unit: s)

static rt_device_t wdt_dev = RT_NULL;
static rt_thread_t feed_thread = RT_NULL;

#define LED_PIN_0    BSP_IO_PORT_06_PIN_00 /* Onboard LED pins */

void hal_entry(void)
{
    rt_kprintf("\nHello RT-Thread!\n");
    rt_kprintf("==================================================\n");
    rt_kprintf("This example project is an driver wdt routine!\n");
    rt_kprintf("==================================================\n");

    LOG_I("Tips:");
    LOG_I("You can run wdt testcase by executing the instruction: \'wdt_sample\'");

    while (1)
    {
        rt_pin_write(LED_PIN_0, PIN_HIGH);
        rt_thread_mdelay(1000);
        rt_pin_write(LED_PIN_0, PIN_LOW);
        rt_thread_mdelay(1000);
    }
}

static void feed_dog_entry(void *parameter)
{
    int count = 0;

    while (1)
    {
        if (count < 10)
        {
            rt_device_control(wdt_dev, RT_DEVICE_CTRL_WDT_KEEPALIVE, RT_NULL);
            LOG_I("[FeedDog] Feeding watchdog... %d", count);
        }
        else
        {
            LOG_E("[FeedDog] Simulate exception! Stop feeding.");
        }

        count++;
        rt_thread_mdelay(WDT_FEED_INTERVAL);
    }
}

static int wdt_sample(void)
{
    rt_err_t ret;

    wdt_dev = rt_device_find(WDT_DEVICE_NAME);
    if (wdt_dev == RT_NULL)
    {
        LOG_E("Cannot find %s device!", WDT_DEVICE_NAME);
        return -1;
    }

    ret = rt_device_control(wdt_dev, RT_DEVICE_CTRL_WDT_START, RT_NULL);
    if (ret != RT_EOK)
    {
        LOG_E("Start watchdog failed!");
        return -1;
    }

    LOG_I("Watchdog started...", WDT_TIMEOUT);

    feed_thread = rt_thread_create("feed_dog", feed_dog_entry, RT_NULL, 1024, 10, 10);
    if (feed_thread != RT_NULL)
        rt_thread_startup(feed_thread);

    return 0;
}
MSH_CMD_EXPORT(wdt_sample, wdt_sample);
Compilation & Download
RT-Thread Studio: Download the Titan Board resource package in the RT-Thread Studio package manager, then create a new project and compile it.
After compilation, connect the Jlink interface of the development board to the PC, and download the firmware to the development board.
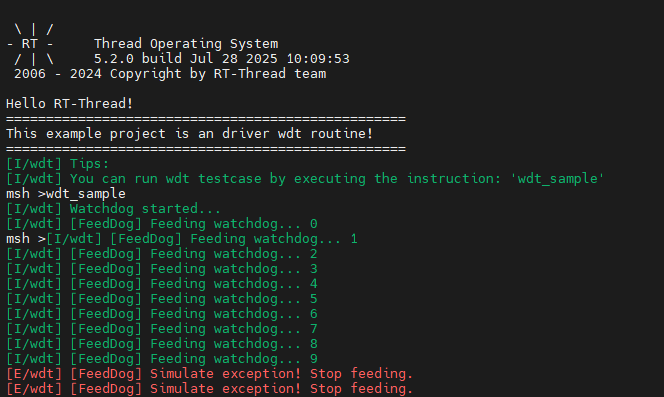
Run Effects
Enter the wdt_sample command at the terminal to run the WDT test program. After feeding the dog 10 times, stop feeding the dog to simulate an abnormal program situation.
References
Device and Driver: WDT Device